This is the fourteenth article of our treehouse project. My plan this year (2020) is to continue working on the treehouse. Click here to start from the beginning of this exciting project.
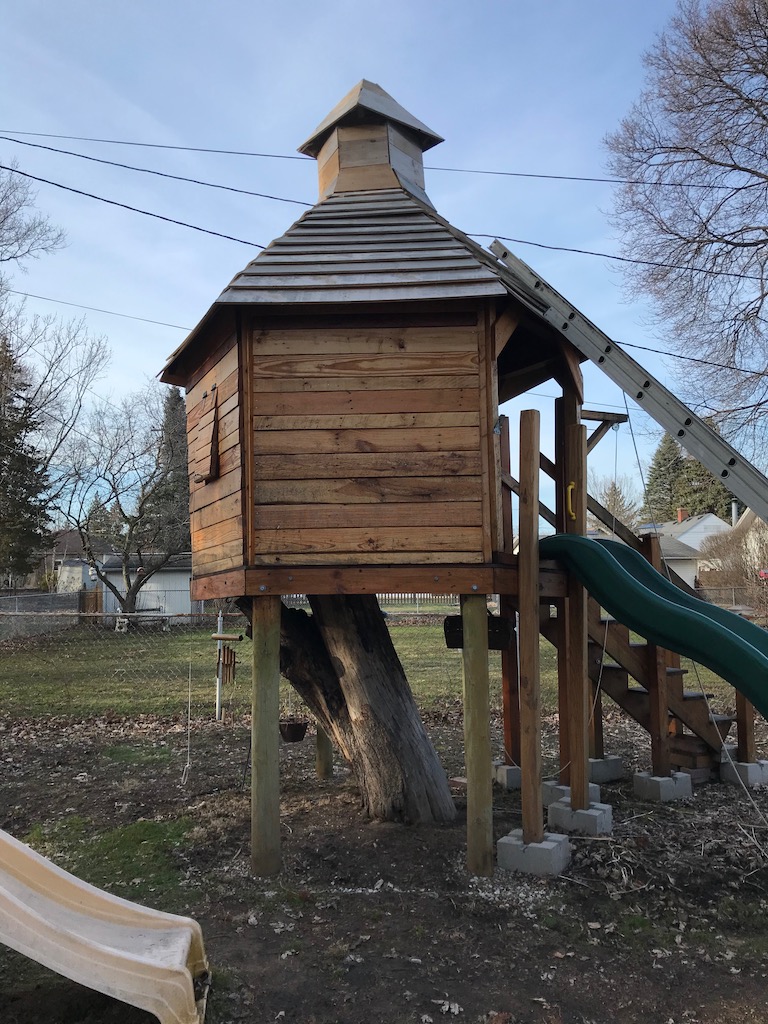
The idea is to build a hexagon shaped treehouse. This article discusses the cupola.
History
It wasn’t until late last year that I was able to secure the remaining pieces of lumber to complete the roof. During this waiting time I also never finished the very top of the treehouse. As a temporary solution I secured a piece of OSB to keep out the weather. This however, was not ideal as the rain and snow eventually got though the top. Eventually this board broke from the screws and blew off the roof. I needed to fix this quickly as it was destroying the hardwood floors I talked about in article 13: Do-It-Yourself- (DIY) Treehouse Project – Part 13 Hardwood Floors.
The lasts few weeks since I’ve been home with the kid I’ve had time to finish the two remaining sections of the roof, and also work on the cupola and completely finish the top of the treehouse.
Cupola
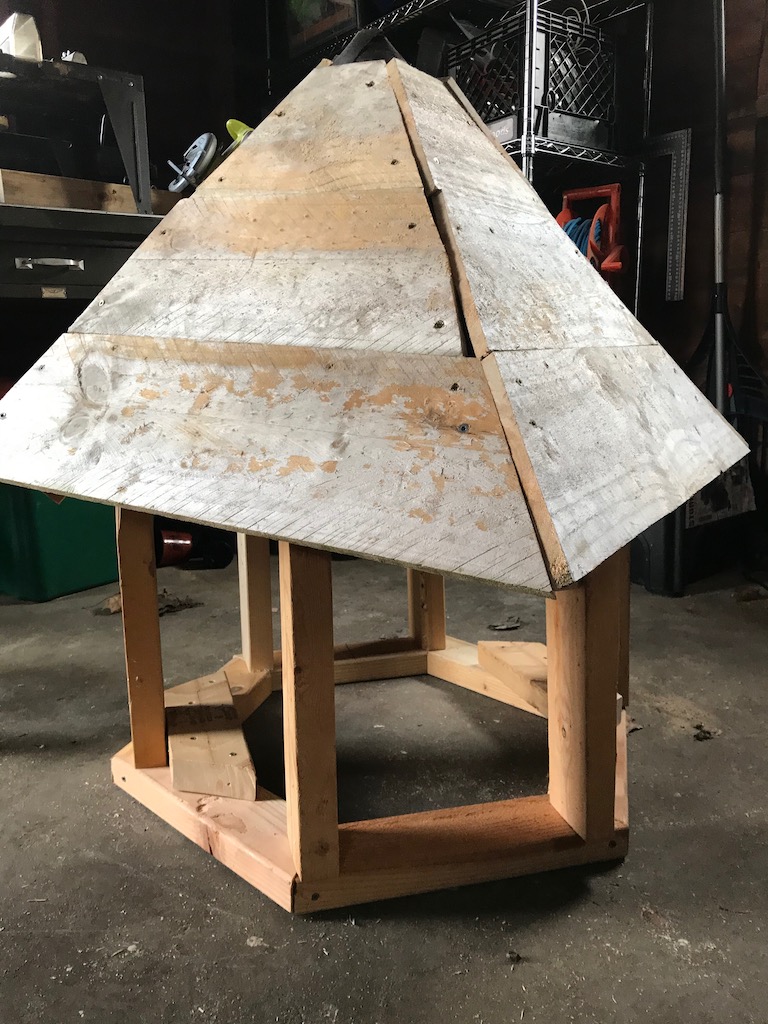
I’ll be honest, I had no plans on how to do this. I simply took a few measurements and set off to create something that would resemble a cupola. My goal was never to have something perfect, but to have something that would provide a “finished look” on the top of the treehouse and also provide protection from the weather.
Since I was in a hurry to get this done I also failed to take as many pictures as I normally do. The few images I did manage to take are included in this article.
Materials
Every piece of the cupola was constructed from left over pieces of pallets and discarded boards. I used left over 2 x 4’s to frame the cupola and left over shingles from the roof to create the cupola top. Everything was custom cut. Because of all the ambiguity in creating this, exact measurements were difficult. I honesty don’t remember the exact sizes as I didn’t make notes while I was creating this.
I’ve added two sheets of house wrap to cover the top of the treehouse. This was placed between the cupola and top frame of the treehouse.
Before cutting and installing the shingles for the cupola, I also added tar paper to cover the cupola frame. I didn’t photograph this either.
No, I did not stain the cupola. The stain that I used for the rest of the treehouse cost me about $90 a gallon, by the time I have it shipped to my house. Since it’s an earth friendly product, it can’t be found at our local home improvement stores.
What I learned
I should have completed the roof or had something else in place before the winter. It would have been nice to have a tarp or some sort of plastic covering the top. The weather eventually got in from the top and destroyed the hardwood floor. So that was the biggest lesson learned during this process.
As for creating the cupola, I wish I would have taken more exact measurements and more pictures for this article.
Installing the cupola
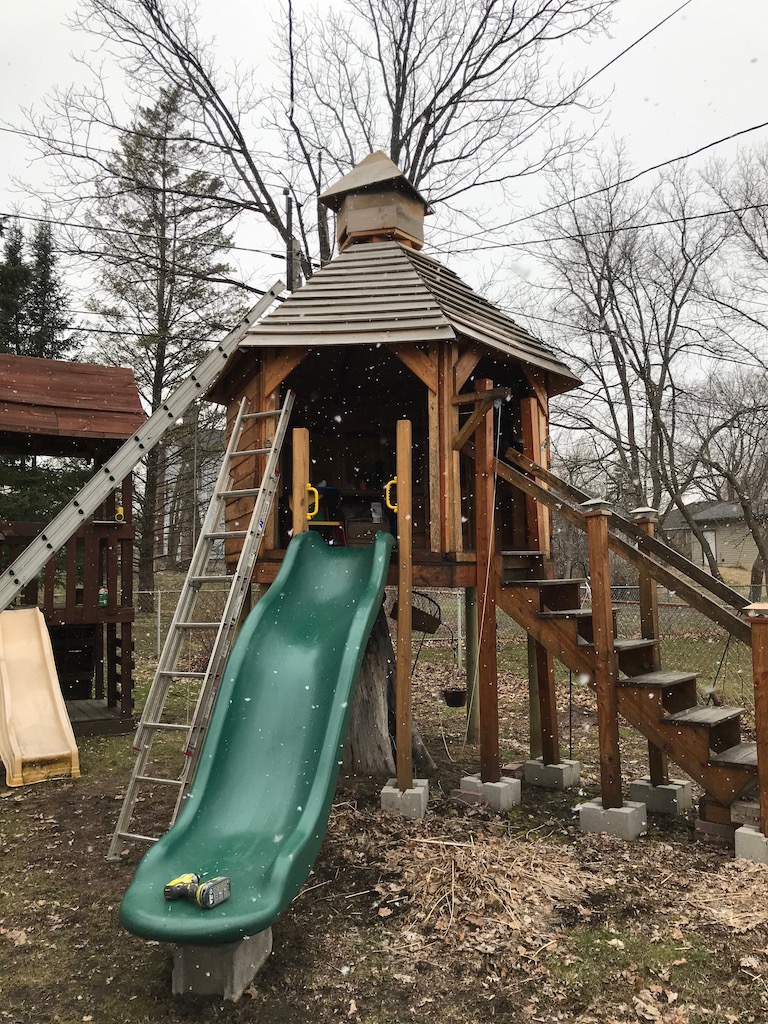
Installation of the cupola was also a challenge. I built this with 2 x 4’s and shingles in my garage. By the time it was all done, it weighted a good bit. It wasn’t just the weight, but also that it was bulky to handle. It wouldn’t even fit through the service door of the garage, I had to open the main door and walk it around to the back yard.
Getting this thing up on the top of the treehouse was also a sight. I had no plans other than to just get it up there. Turns out having a very long ladder helped tremendously.
What we (wife included) ended up doing was stringing a long rope over the top. I ran the rope through the frame at the top. Placed the cupola at the base of the ladder with me holding it. My wife was on the other side of the treehouse with the other end of the rope. As she was pulling the rope I was pushing and walking up the ladder.
This situation worked out much better than I had anticipated. The tension was held by the rope going through the frame at the top and with my wife holding the end of the rope.
I was able to push the cupola up the ladder with less effort as it was being held by the rope and my wife. Problem solved! or I should say cupola installed!!
In the image below the ladder isn’t showed extended up to the top of the treehouse, but that was essentially what we did. I needed a way to show how this was done during the write up for this article. I’m a visual person and I also wanted a reminder, so that 10 years from now I can remember how or what was done to put this thing together.
Updates
The cupola is installed and we had a good hard rain last night and today March 27, 28th, 2020. It seems to be holding up. This makes me happy that we have a solid roof and covering.
Up next is to figure out how to keep the weather out of the two large openings, one by the stairs, and the one by the slide. I’m thinking some form of canvas curtain held together with magnets or some form of clear marine vinyl windows.
I also purchased a 100 watt solar power kit to power the treehouse. We plan to run the kid’s iPad and have fans during the summer to cool and blow away those pesky mosquitos. That will be our project for the summer.
Since the floors got destroyed by the weather I also need to fix that.
We are also going to install a wall in the middle of the treehouse to enclose part of the inside.
What can you do?
- Part Fifteen
- Part Thirteen
- Comment below, Even if it is just to check in and say Hello. I look forward to hearing from you.
- Share this article with your family and friends.
- Sign up for our newsletter.
Follow me on Twitter, pin me on Pinterest, or watch me on Instagram.
Thank you,
Dave